
I like to read and write on e-paper, it helps to disconnect but it also leaves me open to losing my drafts, notes, papers. I skip back and forth between projects and ideas so I bought a reMarkable 2 to help keep things in one place and it certainly helped. Everything is in one place, on the tablet but it didn’t get back to where i needed it. So i would write in the margin of a paper and then that note would fall through the cracks.
With Claude Code i wanted to build something that let me move away from the CLI but still work on some of my Claude based problems. So i created a remarkable mcp that can push papers from my reference library and then pull the ink back, its quite an involved and messy system. The mess was cleaned up into a smaller MCP server that helps turn a reMarkable 2 into a surface which your AI system can interact with. You probably need to be a little proficient with an ai system to set this up, it’s certainly not plug and play.
There are a few tools that ship with the MCP: create, push, write, pull, read, route. An agent puts a document on the tablet, or creates a blank notebook with a title already typed on page one. You mark it up in ink. The marks come back as text, highlights and page images. The agent reads them, separates notes from instructions, and files them to where you tell it to go. My end point is notion of course and there’s a simple notion endpoint for remarkable here
Built on two other people’s work
None of this exists without two open-source projects that did the genuinely hard part, i am but a moron with a claude code subscription. The reMarkable cloud API is undocumented and reverse-engineered, and every push, pull and listing here goes through rmapi. The tablet’s stroke format is parsed by rmscene, which is what makes reading ink and highlights off a page possible at all. This server is a thin cladding, those two are the foundations.
rmsceneThe Python parser for the tablet’s stroke format, MIT: github.com/ricklupton/rmscene
What the loop actually looks like
A classic two call loop, push and pull. The first makes a notebook on the tablet with your pen and template already set and the title typed on page one, this is the default but it can be overwritten in tools/rm_templates.local.json:
rm_new_notebook(title="Field notes", project="Seeing with New Eyes")
In that notebook you write as you normally would whether that’s typing on the folio or scribbling away, a caveat is that you must close and sync the notebook before you run the second call which brings the writing back:
rm_pull_project(name="Field notes", project="Seeing with New Eyes")
What comes back is structured rather than just a dump. If you’ve typed, it’ll come back as text per page, with paragraph styles. And if you’ve scribbled or drawn, it gets converted to a PNG per inked page so the ai system can interpret your handwriting. This data is then assessed and a local log made if you’ve opted in. When that’s done the agent reads the routing file which you will have established during the install conversation and sends your notes/drawings/highlights/text off to where it is meant to go.
I use notion and zotero so they’re my end points but maybe you want obsidian or an excel spreadsheet. The routing file will end up as ROUTING.md, written by the setup from your answers. The agent reads the routing before filing anything, so “where do notes go” should only be answered once at setup and not per pull.
Putting stuff on your remarkable
There are three ways to put something on the tablet. A blank notebook, as above. Typed text you can keep editing on the device with the keyboard, from markdown-ish input. Or a PDF, an EPUB, or an image fitted onto a device-sized page, the create function gives a very basic template for your remarkable (rm2) but that can be changed quite easily when you setup the CREATION.md.
A place for the notes to land
The routing file says where things go in words, which still leaves you to build the place they go. So there is a ready-made one: a Notion database that is plainly an endpoint. One row per item, and each item is a note to keep, a directive for the agent, or a highlighted passage, carrying the document and page it came from. You duplicate it from its Notion page and tell the agent that installed this server to add the Notion endpoint. It writes two lines and six rules into the routing file.
The readback is pretty important, after the filing an agent reads every item back by its key, and lets you know how many arrived out of how many it sent. I added that because my own pipeline reported 118 pages as routed that never arrived anywhere. The read-back is not strictly necessary but it’s definitely useful.
Nothing about the rules is particular to Notion. A folder of markdown files, an Obsidian vault or a spreadsheet works the same way, as long as it holds one record per item, carries the key, and can be asked for a record by that key. Notion is simply the one I built first and it’s based on my goals, the database key really doesn’t matter.
Reading handwriting
In my private pipeline i used gemini as the vision API, i did a few tests because my handwriting is bad, claude did a pretty good job but gemini came out on top with low cost and a pretty excellent hit rate.
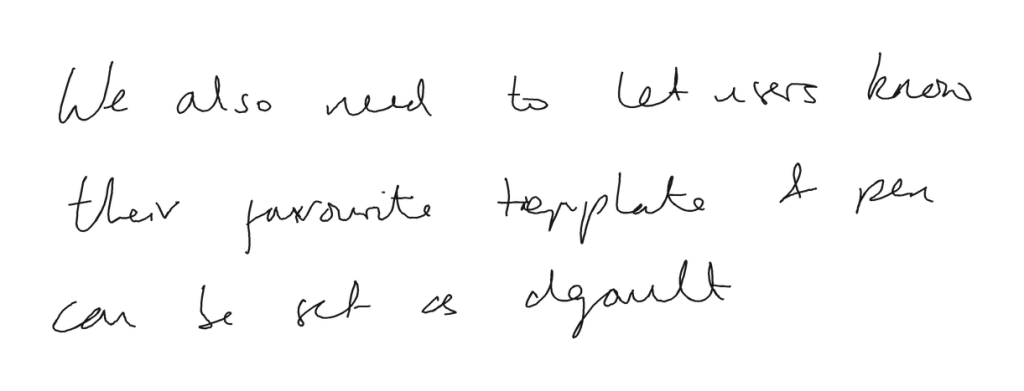
What Claude read from that page, and filed as a directive rather than a note: “We also need to let users know their favourite template & pen can be set as default.”
You can of course set that vision pipeline up yourself but the public server does not use it. The page images go straight back to the agent that asked for them, and that agent reads the handwriting itself. If you are driving this from Claude Code then Claude will read it (so be careful with what you’re writing). No vision key, no per-page charge, nothing to configure but of course if you want to run this locally then that is your perogative.
Highlights are cheaper still. A highlighter stroke over a PDF is intersected with the PDF’s own text layer, so the passage comes back exactly, with no model involved. Snap-to-text highlights already carry their text. Neither needs OCR.
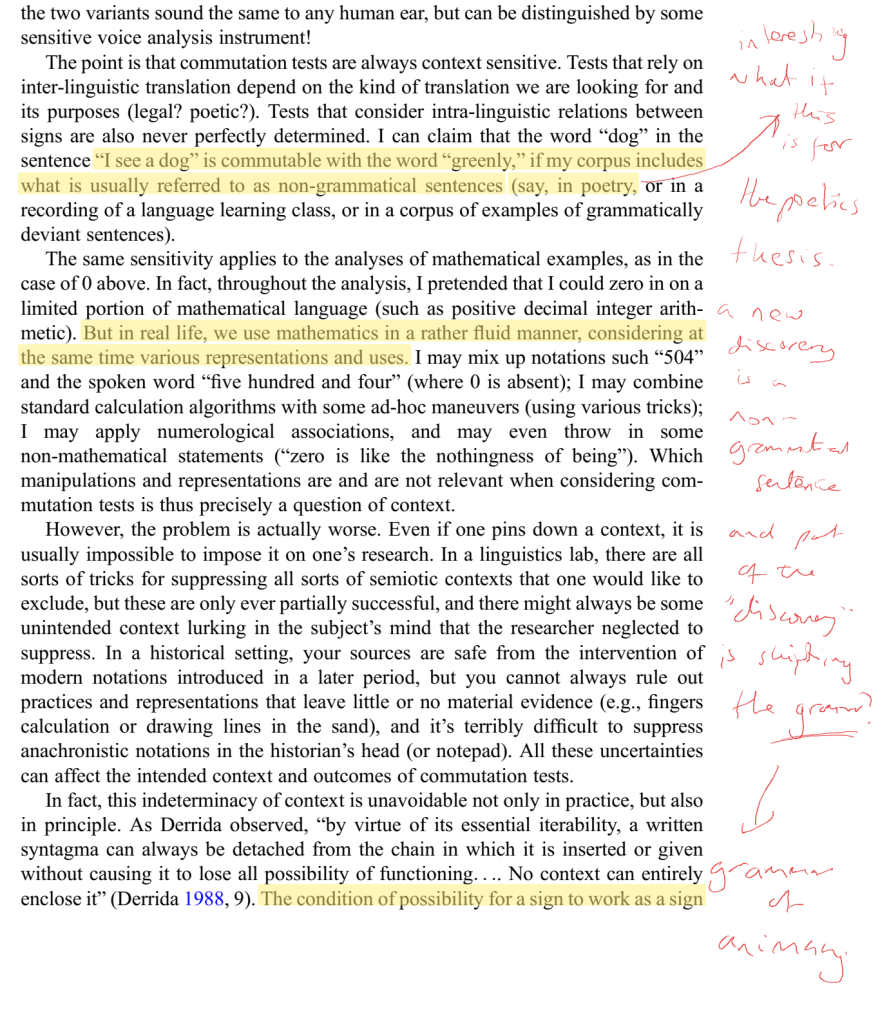
And if you’re like me and highlight and write then your agent can interpret that as well since the highlighter stroke and writing are on different layers it can get a composite shot as well as splice out the two images to read correctly – although this requires a licensed piece of code that is quite easily built on your private pipeline
What came back from that page: the three highlighted passages as text, and the red note as Claude read it, “interesting, what if this is for the poetics thesis. A new discovery is a non-grammatical sentence and part of the ‘discovery’ is shifting the grammar? → grammar of animacy.”
What it deliberately leaves out
My version of this is wired into my reference library and my Notion workspace, and is getting wired into other areas. Push a collection of papers to the tablet, drain the annotations back, write a note into the library against the original paper. That loop, pull a paper, get the highlights out, transcribe the margins, file the result back where it came from, is the thing that made the private pipeline worth having and is very much ME, it’s a lot of routing and database columns and folder names. Generalising them is real work rather than a config flag. So deliberately it’s thin and you can do the rest, it works its janky but it’s built for the interpretation by ML, run the first iteration on a frontier model and most of that janky code will be smoothed out. You can build complex end points that are infinitely better than mine or far more simple.
Two more absences worth naming. There is no composited annotated PDF, the flattened page with the ink drawn into it, because the only library that could draw it is AGPL and this repository is MIT. The step is reported as skipped rather than hidden. And there is no CI badge. The most valuable tests compare rendered pixels, and rasterisation drifts across platforms. So i would really recommend running a calibration run, there’s a prompt for one at the end.
Getting it running
You need a reMarkable 2 specifically. The geometry constants are calibrated to its screen and a Paper Pro renders at the wrong scale. You need a cloud account, rmapi on your path and paired once, and Python 3.10 or newer. That is the list. There is no vision key to set, because the agent reads the pages itself.
The agent should walk you through everything, from the python to where notes live, and from what can or can’t be touched to where notes go. Every question should have a flag, so an agent can run the whole walk on your behalf.
Twenty-one tools, all on by default. Every one returns the same envelope, and when something fails the error names the dependency that failed and the actual next step, rather than a stack trace. The two destructive tools, move and delete, default to a dry run that returns a plan, and refuse paths outside the folders you named at setup unless you override that explicitly. Delete never recurses, and it refuses a folder it cannot list. Calls to the cloud go out one at a time, and if the cloud answers with a rate limit everything stops for five minutes rather than retrying into a lockout.
If you want to try it, this is the prompt to paste into your agent. It installs the server, then calibrates it against your own tablet:
Install the reMarkable MCP server from github.com/iniphi/remarkable-mcp.Read its CLAUDE.md first. Run the setup with me, asking me each questionrather than answering for me. Then run the tests and tell me how manypassed, skipped and failed.Then calibrate it against my tablet. Make a one-page PDF, 468 x 624 pt,with a heading and two short paragraphs, and push it to my reMarkable.Tell me to highlight one sentence and write one word in the margin, thenclose and sync. When I say done, pull it back and show me the sentence,what you read in the margin, and the page image. If either is wrong,stop and tell me before filing anything.
Part of Build in Public, a series on wiring Claude into the tools I actually use. Previously: Connect Claude to Notion, the loop every other post in the series runs on.


Leave a comment